Use AWS Route53 Setup a Failover to Static Website on S3 Bucket
AWS Route53 is a Domain Name System (DNS) web service. You can use Route 53 to perform three main functions:
- Register domain names
- Route internet traffic to the resources for your domain
- Check the health of your resources
This article will focus on route internet traffic and how to implement failover.
What is Failover?
Failover can give your applications to achieve high-availability and fault-tolerance. Every application should build in at least two regions, the traffic will switchover from the primary server to the secondary server when the primary server occurs failure. Let users of the application do not experience downtime.

Route53 Routing Policies
When you create a Record in Hosted Zones, there are several routing policy you can choose from Route53:
- Simple routing policy
Route traffic to the single resource with a domain name.
◎ Cannot be used with a health check. - Weighted routing policy
Route traffic to multiple resources with a single domain name. Routing policy base on the weight that you assign to the record as a proportion. - Geolocation routing policy
Route traffic to a resource which location of DNS server is closest to users.
For example, the queries from Japan to be routed to an ELB in the Tokyo region. - Latency-based routing policy
Route traffic to the AWS region with the lowest latency, if your application is hosted in multiple AWS Regions. - Failover routing policy
Route traffic to a resource when the resource is healthy or to a different resource when the first resource is unhealthy.
◎ It must be used with a health check. - Multivalue answer routing policy
Respond to DNS queries with up to eight healthy records selected at random.
◎ Like simple routing policy, but with a health check.

Failover Scenarios
- Active-passive
Route 53 returns a primary resource to be available, and a secondary resource to be on standby in case all the primary resources become unavailable.
◎ Configured using a failover routing policy. - Active-active
Route 53 returns multiple resources. In case of resource becomes unavailable, Route 53 can detect and stop including it when responding to queries.
◎ Configured using any routing policy besides failover.
Overview
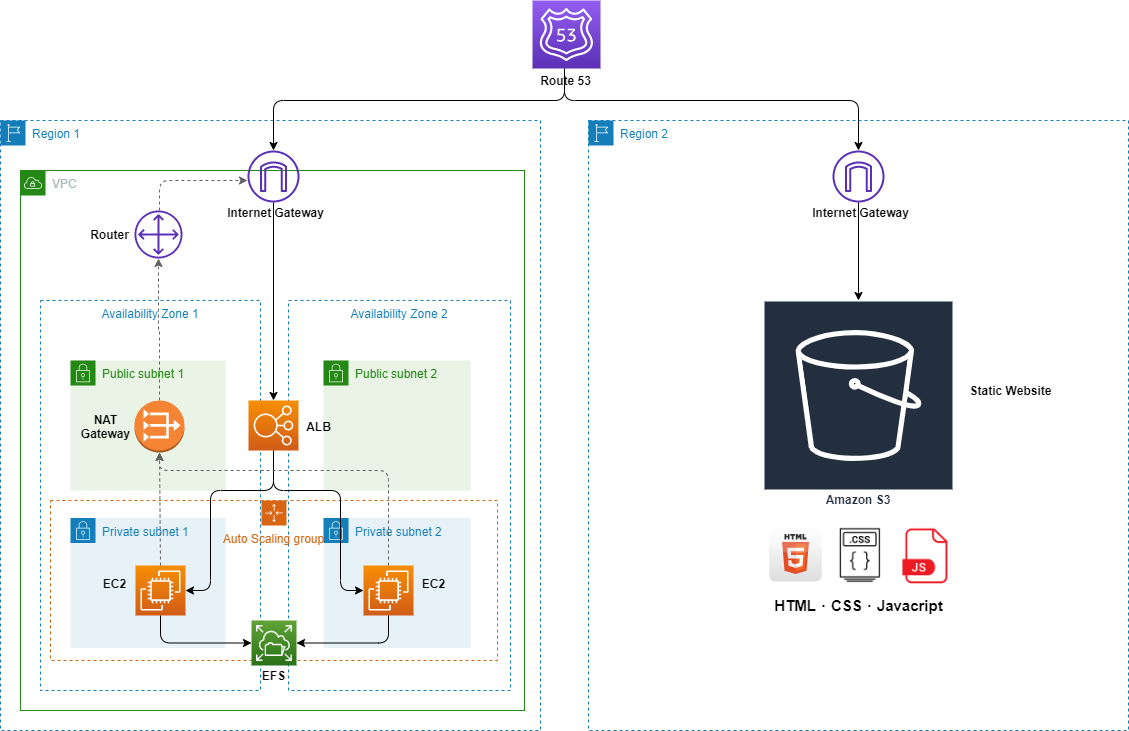
Scenario
Build a two-tier web server with Nginx. In order to achieve high availability, we need to use Route 53 to implement failover. When the website is unhealthy, redirect the traffic to s3 static website.
How will we achieve this?
- Build a basic infrastructure with EC2, Load Balancer, Auto Scaling.
- Build a static website on S3 Bucket.
- Use Route53 Failover-routing-policy to implement Failover.
Prerequisites
- Setup VPC environment which includes 2 public subnets, 2 private subnets, and NAT Gateway.
- Make sure the region is US West (N. California).
Step by Step
Step 1: Create EC2
- Go to EC2 -> Instances
- Launch Instance
- AMI: Amazon Linux 2
- Instance Type: t2.micro - Configure Instance Details
- Type the Name you like.
- Network: choose your VPC
- Subnet: put the instance in Public Subnet - Security Group: allow ssh/22 and http/80 port
- After instance created, use public IP and ssh into it.
- Install Nginx
sudo amazon-linux-extras list | grep nginx
sudo amazon-linux-extras enable nginx
sudo yum clean metadata
sudo yum -y install nginx
sudo systemctl start nginx
sudo systemctl enable nginx
# Check the path nginx config
nginx -t
# Entry point of website
/usr/share/nginx/html
# Default port of nginx is 80
Step 2: Create Application Load Balancer
- Go to EC2 -> Load Balancers
- Create Load Balancer, then choose Application Load Balancer as type.
- Basic Configuration
- Type the Name you like.
- Scheme: internet-facing
- Listeners: 80 Port
- Availability Zones: put ALB in Public Subnet
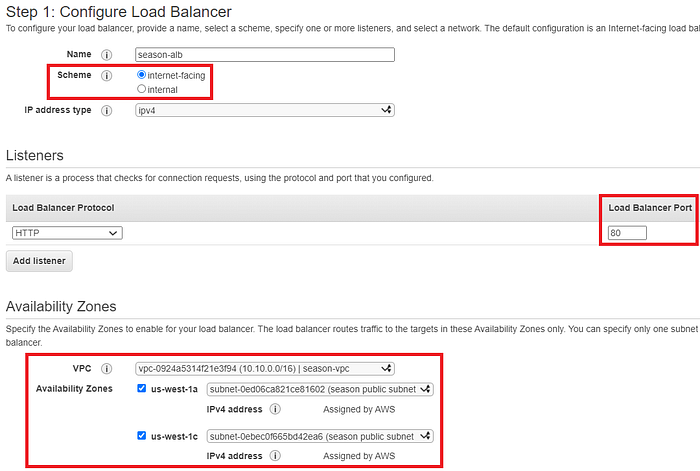
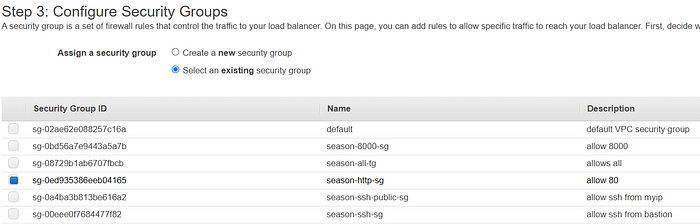
- Security Group: allow http/80
- Target Group
- Target Type: Instance
- Port: 80, which is port of Nginx.
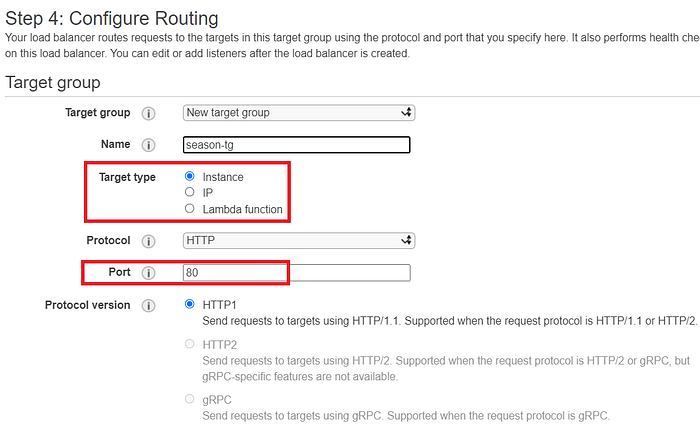
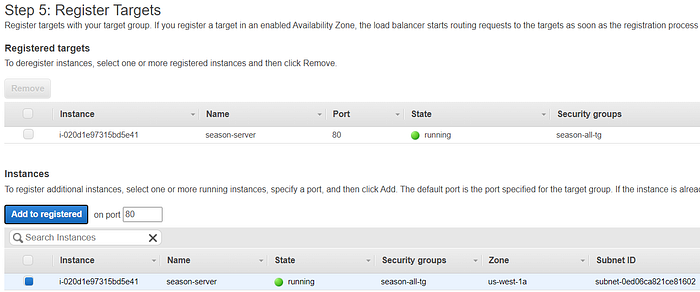
- Register Targets
- Choose the instance you created, then click Add to registered.
- Then Create.
Step 3: Create Auto Scaling
First, we need to create customized image. This image will COPY the instance we set up, which includes Nginx.
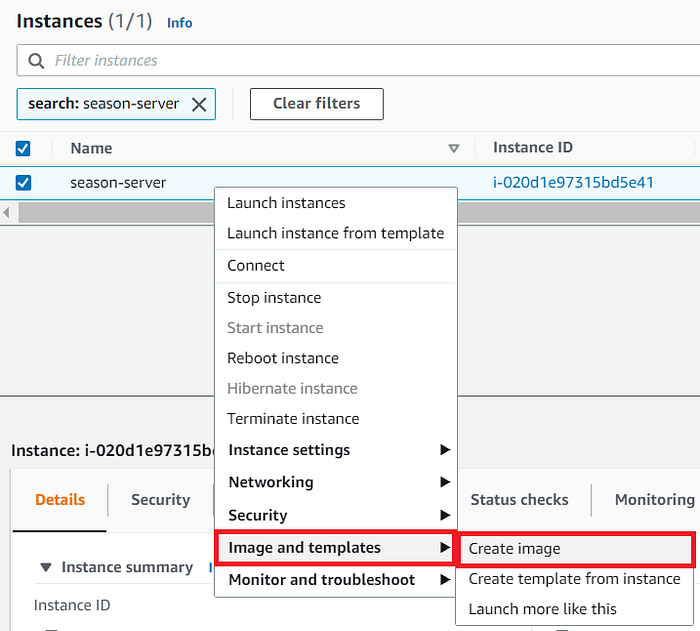
- Go to EC2 -> Instances
- Select the instance we have set up. Right-click it, choose Image and templates -> Create image.
- Type the Name you like.
- No reboot: Enable
- Then click Create image
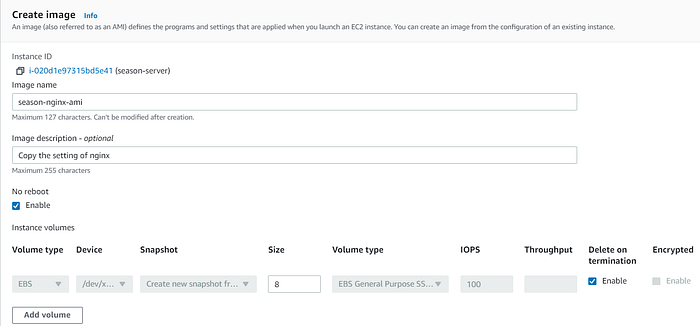
- You can check your customized image in AMIs
After your image created, we can set Auto Scaling next.
- Go to EC2 -> Auto Scaling -> Launch Configurations
- Create launch configuration
- Type the Name you like.
- AMI: choose the customized AMI we created.
- Instance type: t2.micro
- IAM instance profile: select role with inclouds SSM.
- Security Group: allow http/80 port
- Then Create launch configuration - Create an Auto Scaling group
- Type the Name you like.
- (Switch to launch configuration)
- Launch configuration: select launch configuration we created.
- Network: select your VPC, and put instance in Private Subnet.
- Load balancing: Attach to an existing load balancer
- Select load balancer target groups you created.
- Group Size: 2 Desired, 2 Minimum, 3 Maximum
- Then Create Auto Scaling group.
Step 4: Create a Domain
You need to buy a domain first, so that create hosted zone will be effective.
- Go to Route53 -> Hosted Zones
- Create hosted zone
- Type the Domain name you like. In this project, I usedecvming.netas an example.
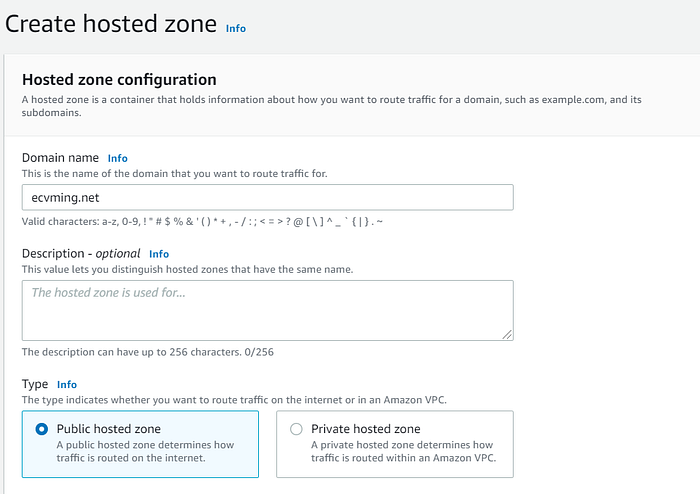
⭐ Note: Please remember your domain name, you will use it to create an s3 bucket later.
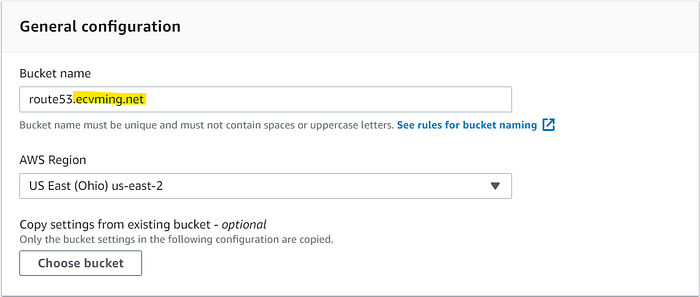
Step 5: Create S3 Bucket
- Go to S3 Buckets, then Create bucket.
- General Configuration
- In Bucket name, type a subdomain name you like, and plus your domain name you created.
- AWS Region: us-east-2 (Ohio) (Different region from instance)
- Unclick `Block all public access`
- Remember to click `I acknowledge that the current…`
- Then Create bucket.
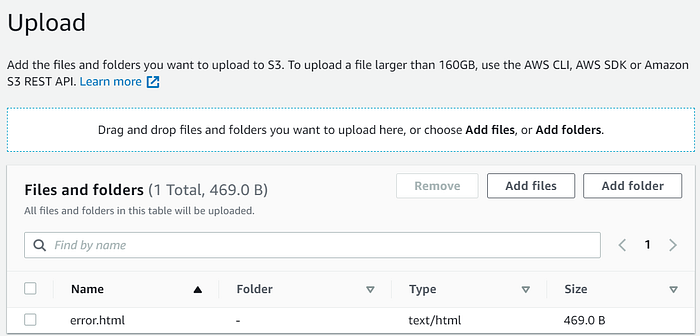
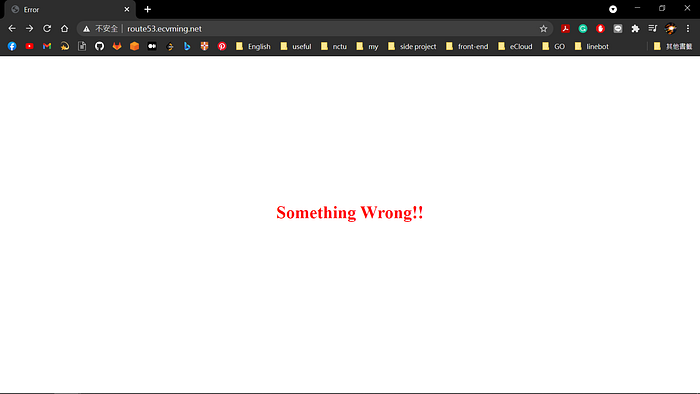
- Upload a HTML file.
In this project, I upload error.html as an example.
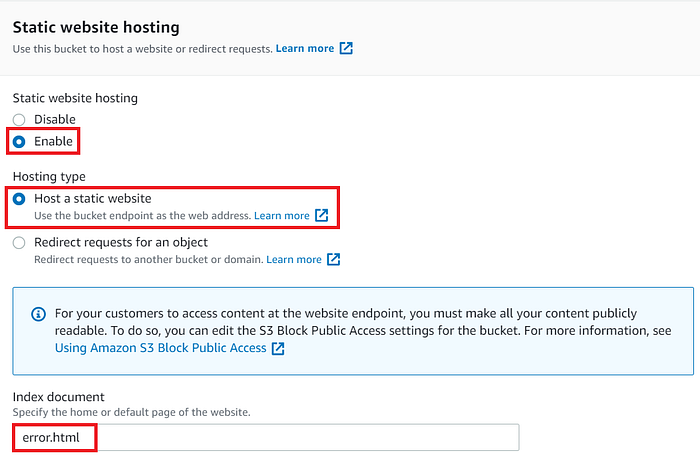
- Set Static website hosting in Properties
- Static website hosting: Enable
- Hosting Type: Host a static website
- Index document: error.html (the file you uploaded)
- Set Bucket policy in Permissions
- Paste the following policy.
- Remember to replace {Your_Bucket_Name}.
{
    "Version": "2012-10-17",
    "Statement": [
        {
            "Sid": "PublicRead",
            "Effect": "Allow",
            "Principal": "*",
            "Action": [
                "s3:GetObject",
                "s3:GetObjectVersion"
            ],
            "Resource": "arn:aws:s3:::{Your_Bucket_Name}/*"
        }
    ]
}
Step 6: Create Route 53 Routing Policy
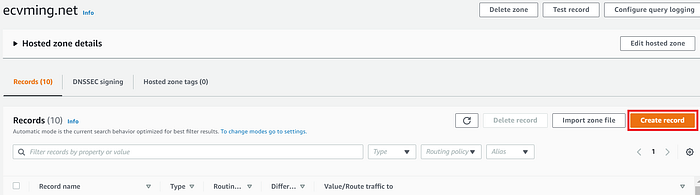
- Go to Route53
- Go to Hosted zones, then choose your Domain name. Click in, then Create record.
- Create the first record as Primary failover type.
1. In Record name, type the subdomain you named as s3 bucket.
2. In Record type, choose A.
3. In Value, click Alias, then turn into Route traffic to.
- Select Application Load Balance as the endpoint.
- Select California as region in which ALB located.
- Then choose your Nginx ALB.
4. In Routing policy, choose Failover policy.
5. In Failover record type, choose Primary.
6. In Record ID, type the name you like.
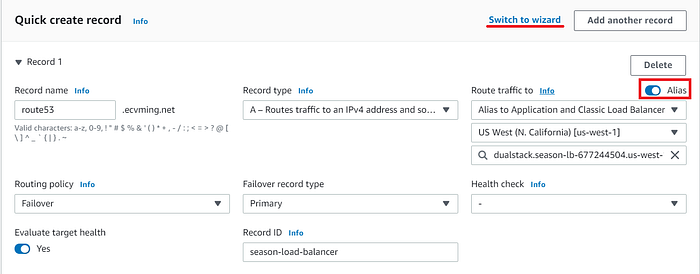
If you can’t see this interface, click Switch to… in the right corner.
- Click Add another record to create the second record as Secondary failover type.
1. In Record name, type the subdomain you named as s3 bucket.
2. In Record type, choose A.
3. In Value, click Alias, then turn into Route traffic to.
- Select S3 bucket as the endpoint.
- Select Ohio as region in which s3 bucket located.
- Then choose your s3 bucket.
4. In Routing policy, choose Failover policy.
5. In Failover record type, choose Secondary.
6. In Record ID, type the name you like.

- Then Create records.
⭐ Note: The record name of primary and secondary must be the same. And the s3 bucket name must also be same as record name, otherwise you will not find the s3 bucket when you create the record.
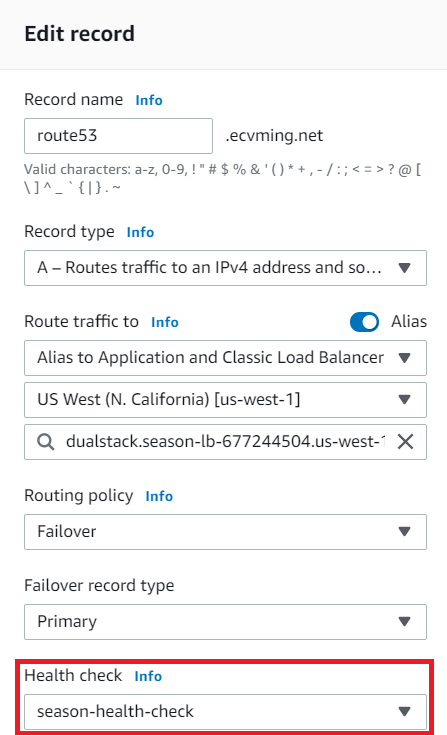
Step 7: Create Route53 Health Checks.
- Go to Route53 -> Health Checks
- Create health check
- Choose Domain name as the endpoint.
- In Domain name, type the Record name you created in Record.

- After creating health check, go back to the record you created.
- Edit Primary Record, choose the Health check you created.
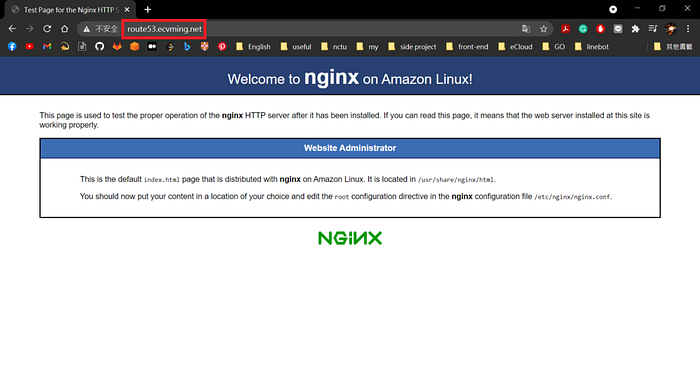
Step 8: Verify Result
- Paste your Record Name to the browser, you will see the welcome page of nginx.
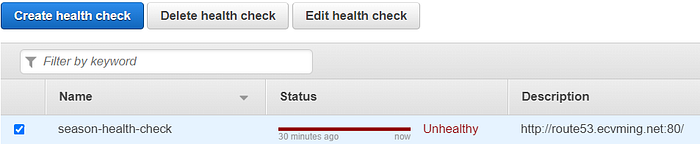
- Then stop instance or stop nginx, confirm whether it has redirected to s3 static website.
It will wait for a while for the route53 health check to become unhealthy.
Reference
Amazon Route 53
How to implement the perfect failover strategy using Amazon Route53
DNS Failover with Route53
How to Setup a Failover to a static website on S3 Bucket in AWS